You knew by look it is based on the Gradient code box with a very cool design. It is suitable for a classic theme which gives a very beautiful look.
Previously I mention it adds the feature of the syntax highlighter and copy to the clipboard button.
how to add a gradient code box in blogger
Before jump into this make sure to back up your theme. Also, Read this How to Backup your Blogger Template.
1. Login into your blogger Dashboard.
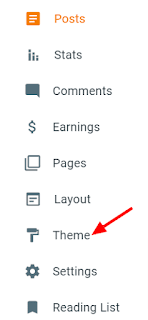
2. Then on the left-hand side go to the Theme.
3. On the Customize button, click the Down arrow.
4. Then select the Edit HTML.
5. Now press "Ctrl + F " to search and find <head> tag.
<!-- code provide by wizard point start -->
<link href='https://use.fontawesome.com/releases/v5.0.13/css/all.css' rel='stylesheet' type='text/css'/>
<script src='https://cdnjs.cloudflare.com/ajax/libs/jquery/3.3.1/jquery.min.js'/>
<script src='https://cdnjs.cloudflare.com/ajax/libs/clipboard.js/2.0.1/clipboard.min.js'/>
<script src='https://cdnjs.cloudflare.com/ajax/libs/highlight.js/9.12.0/highlight.min.js'/>
<script>$(function() {
$('pre code').each(function(i, block) {
hljs.highlightBlock(block);
});
});
</script>
<!-- wizard point -->
<!-- code provide by wizard point end --> 6. After you have found it just past the code below <head> tag.
7. Type and search for "]]></b:skin>" tag.
8. Just above the "]]></b:skin>" add this CSS code.
 #clpmsg,
#clpmsg::before,
.clpbrd {
    position: absolute
}

pre {
  position: relative;
  overflow:hidden;
  background:#9897A9;
  margin: 10px auto 0;
  font-size: 16px;
  border: 10px solid black;
  width: 60%;
  padding-left: 2em;
  border-image: url("data:image/svg+xml;charset=utf-8,%3Csvg width='100' height='100' viewBox='0 0 100 100' fill='none' xmlns='http://www.w3.org/2000/svg'%3E %3ClinearGradient id='g' x1='0%25' y1='0%25' x2='0%25' y2='100%25'%3E%3Cstop offset='0%25' stop-color='%23cffffe' /%3E%3Cstop offset='25%25' stop-color='%23f9f7d9' /%3E%3Cstop offset='50%25' stop-color='%23fce2ce' /%3E%3Cstop offset='100%25' stop-color='%23ffc1f3' /%3E%3C/linearGradient%3E %3Cpath d='M1.5 1.5 l97 0l0 97l-97 0 l0 -97' stroke-linecap='square' stroke='url(%23g)' stroke-width='3'/%3E %3C/svg%3E") 1;
  font-size: 15px;
  max-height: 200px;
  line-height: normal;
  width: auto;
  white-space: pre-wrap;
  padding-bottom: 1em
}
pre:hover {
  overflow-y: auto;
  overflow-x: auto;
}
.clpbrd {
    background: #fff;
    border: 1px solid #d5d5d5;
    border-radius: 3px;
    width: 25px;
    height: 25px;
    padding-bottom: 2px;
    padding-right: 0.2em;
    cursor: pointer;
    right: 1px;
    -webkit-transition: opacity .3s;
    -o-transition: opacity .3s ;
    transition: opacity .3s ;
    opacity: 0
}

pre .clpbrd:hover #clpmsg,
pre:hover .clpbrd {
    opacity: 1
}

pre .clpbrd:active,
pre .clpbrd:hover {
    background-color: #ddd;
    background-image: none;
    border-color: #b5b5b5;
    transition: .3s;
    box-shadow: inset 0 2px 4px rgba(0, 0, 0, .15)
}

pre .clpbrd:focus {
    text-decoration: none;
    border-color: #51a7e8;
    outline: 0;
    box-shadow: 0 0 5px rgba(81, 167, 232, .5)
}

#clpmsg {
    background-color: #000;
    color: #fff;
    padding: 3px 5px;
    border-radius: 3px;
    word-break: initial;
    height: 17px;
    top: -1px;
    right: 31px;
    opacity: 0;
    -webkit-transition: opacity 1s ease-in-out;
    -o-transition: opacity 1s ease-in-out;
    transition: opacity 1s ease-in-out
}

#clpmsg::before {
    content: "";
    border: 10px solid;
    top: 2px;
    border-color: transparent transparent transparent #000;
    right: 0;
    margin-right: -15px;
    width: 0;
    height: 0
}
.hljs{display:block;background:#9897A9}.hljs-keyword,.hljs-link,.hljs-literal,.hljs-section,.hljs-selector-tag{color:#8be9fd}.hljs-function .hljs-keyword{color:#ff79c6}.hljs,.hljs-subst{color:#f8f8f2}.hljs-addition,.hljs-attribute,.hljs-bullet,.hljs-name,.hljs-string,.hljs-symbol,.hljs-template-tag,.hljs-template-variable,.hljs-title,.hljs-type,.hljs-variable{color:#f1fa8c}.hljs-comment,.hljs-deletion,.hljs-meta,.hljs-quote{color:#6272a4}.hljs-doctag,.hljs-keyword,.hljs-literal,.hljs-name,.hljs-section,.hljs-selector-tag,.hljs-strong,.hljs-title,.hljs-type{font-weight:700}.hljs-emphasis{font-style:italic}
9. In the last step find the </body> tag.
10. Just above the </body> tag past the code.
<!-- script By https://wizardpoint.blogspot.com end-->
<script>function showTooltip(elem){$("<span id='clpmsg'>Copied</span>").prependTo(elem),$(elem).children().first().delay(1e3).fadeOut(1e3,function(){$(this).remove()})}$("<button class='clpbrd' data-clipboard-action='copy' data-clipboard-target='pre code'><i class='far fa-clone'/></button>").insertBefore("pre code");var clipboard=new ClipboardJS(".clpbrd",{target:function(trigger){return trigger.nextElementSibling}});clipboard.on("success",function(e){e.clearSelection(),showTooltip(e.trigger)});var TopOffset=parseInt($(".clpbrd").css("top"));$("pre").scroll(function(){$(".clpbrd").css({top:$(this).scrollTop()+TopOffset})});</script>
<!-- script By https://wizardpoint.blogspot.com end-->Now to Implement this code
First, you need to convert your code you want to implement.1. Go to HTML entity encoder/decoder. And convert your code.
2. Now, Go to your post where you want to add Code and just select the "Html view option" and insert the code as mention below.
 <pre><code>
Your code goes here..........
</code></pre>Happy coding!
Tags:
Blogger


